Monday, December 9, 2024


Configuring Secure LDAPs on Domain Controller


This opens another Management Console for Certificate Templates separately in another window. Find Kerberos Authentication from Template Display Name list and right click on it. Choose Duplicate Template from context menu. On the New Template Properties on General tab provide Template display name LDAPs and choose Publish certificate in Active Directory. Go to Request Handling tab and choose Allow private key to be exported. Next in the Subject Name, choose both User principal name (UPN) and Service principal name (SPN) and click OK.


This newly generated copy of Kerberos Authentication certificate template will show as LDAPs in the templates list. Close Certificate Template Console.


After closing certificate template console, It will return to certsrv (Certification Authority) mmc console. On the Certificate Template right click and choose New >> Certificate Template to Issue. In the Enable Certificate Templates choose LDAPs name. and click OK. IF IT DOES NOT SHOW UP- run "certutil -setCAtemplates +LDAPs


Newly enabled certificate template will show on the list.


Certificate templates is configured, its time to use it. Now new SSL certificate need to be generated on Active Directory Domain Controller. Search and open mmc.exe, Go to File >> Add/Remove Snap-in then click Certificates and click Add. The certificates snap-in allows you to browse the contents of the certificate stores for yourself, a service, or a computer.


First select Computer account on Certificates snap-in and in the Select Computer keep default Local computer (the computer this console is running on) and press Finish. Repeat same process again click Certificates and click Add, but this time choose Service account and in the Select Computer keep default Local computer (the computer this console is running on), on the next select Active Directory Domain Services. In the last click Finish. Now under selected snap-ins you will see two certificates snap-ins, Click OK to proceed.

This will help to install certificates, which are digital credentials used to connect to wireless networks, protect content, establish identity, and do other security-related tasks.


Next on the Domain Controller, go to Certificates (Local Computer) mmc console - it is a LocalMachine certificate stores (Computer Account). Under Personal >> right click Certificates and choose All Tasks, then Request New Certificate. On the Certificate Enrollment Wizard, click Next on Before you Begin and Select Certificate Enrollment Policy, Request LDAPs certificate from list, the earlier created one by clicking check box. Check if Certificate Installation status is succeeded and press Finish (If it is failing restart Certificate Authority services and try again).


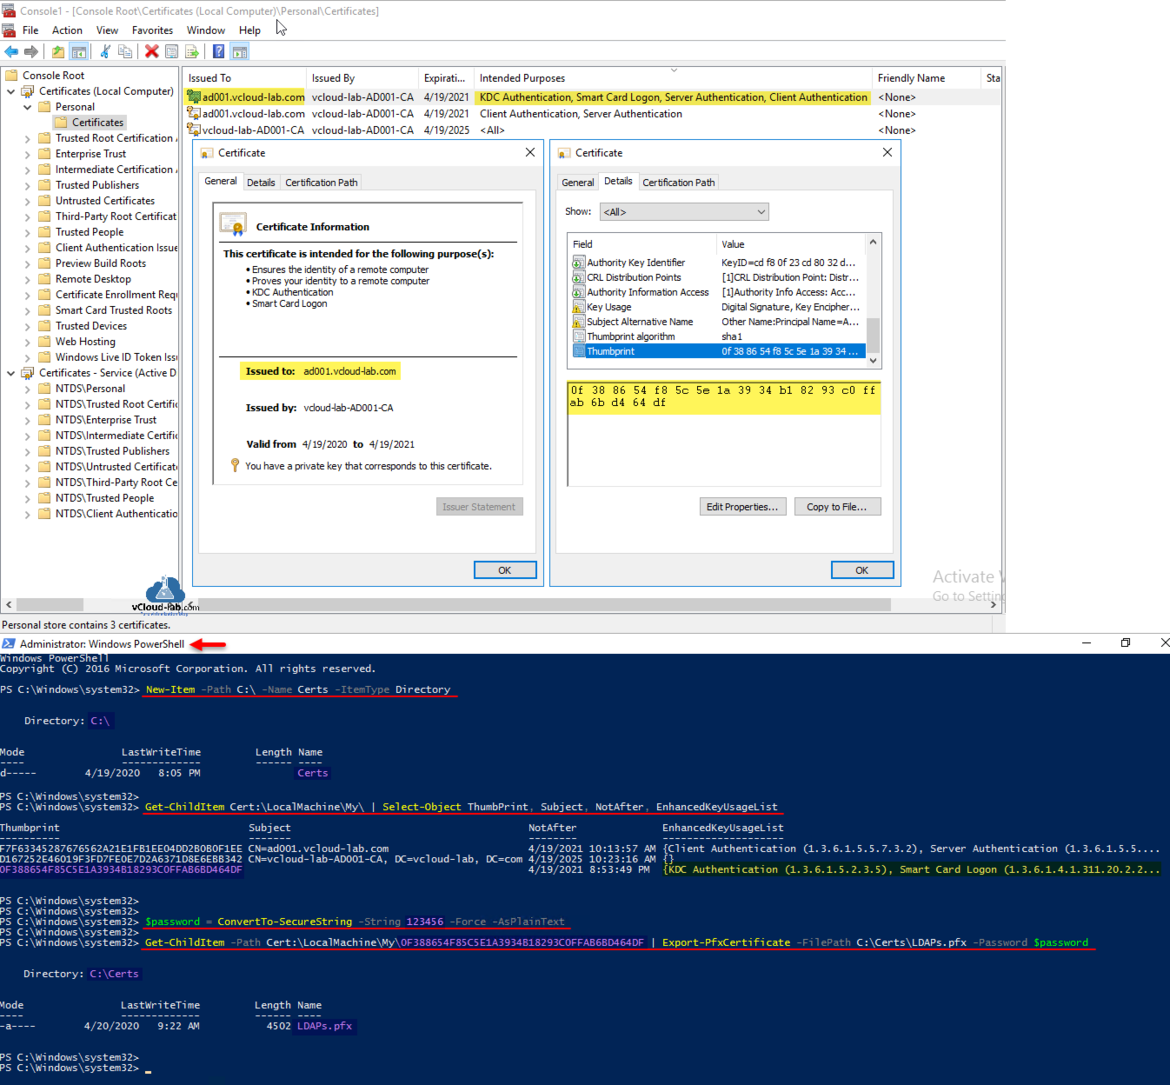
New certificate will be listed with Certificate Intended Purposes is KDC Authentication, Samrt Card Logon, Server Authentication, Client Authentication. and Issued to is FQDN of domain controller computer where this certificate was installed. Note down Thumbprint

Create a new Folder with below command.

New-Item -Path C:\ -Name Certs -ItemType Directory

Next from the LocalMachine >> Personal certificates store list all the certificates specially with ThumbPrint. Match the thumbprint on the cert, and use it to export it as PFX certificate with password.

Get-ChildItem Cert:\LocalMachine\My\ | Select-Object ThumbPrint, Subject, NotAfter, EnhancedKeyUsageList

#Change Password and Certificate ThumbPrint accordingly.
$password = ConvertTo-SecureString -String "123456" -Force -AsPlainText
Get-ChildItem -Path Cert:\LocalMachine\My\0F388654F85C5E1A3934B18293C0FFAB6BD464DF | Export-PfxCertificate -FilePath C:\Certs\LDAPs.pfx -Password $password

My new certificate is generated unde path C:\Certs with name LDAPs.

console root mmc localmachine personal my kdc authentication thumbprint certificate authority ca server LDAPs over SSL vmware vsphere identity federation adfs adcs.png


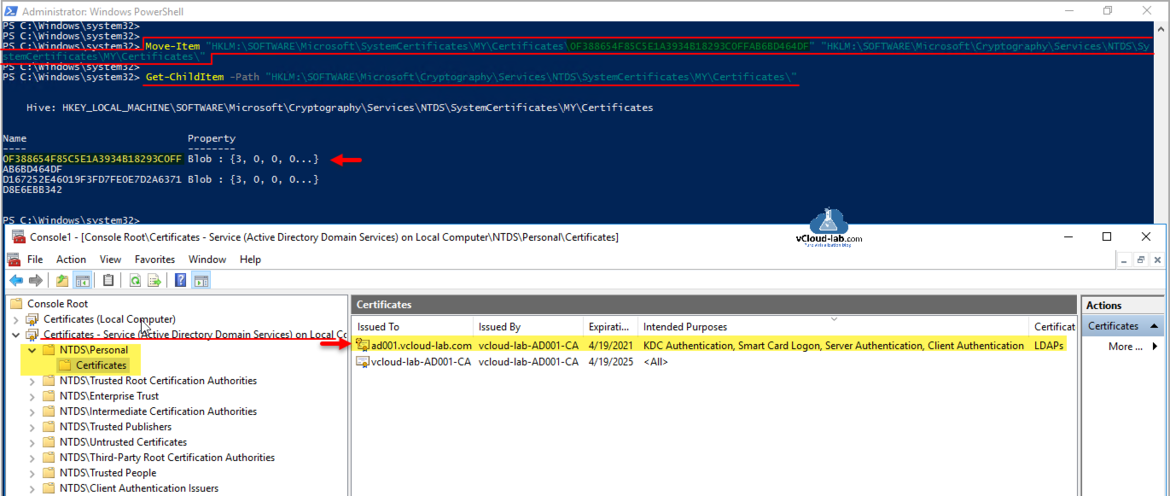
Next copy the certificate from LocalMachine Personal store to the Active Directory Domain Services Service Account Certificate store under NTDS\Personal Certificates, using below command. 

#Change Certificate ThumbPrint accordingly.
Move-Item "HKLM:\SOFTWARE\Microsoft\SystemCertificates\MY\Certificates\0F388654F85C5E1A3934B18293C0FFAB6BD464DF" "HKLM:\SOFTWARE\Microsoft\Cryptography\Services\NTDS\SystemCertificates\MY\Certificates\"

Verify certificates in MMC console or on registry location HKLM:\SOFTWARE\Microsoft\Cryptography\Services\NTDS\SystemCertificates\MY\Certificates\ whether they are added successfully.

move-Item certificate system certificate authority hklm active directory domain services KDC server authentication Export-pfxcertificate import-certificate enroll LDAPS ad ssl.png

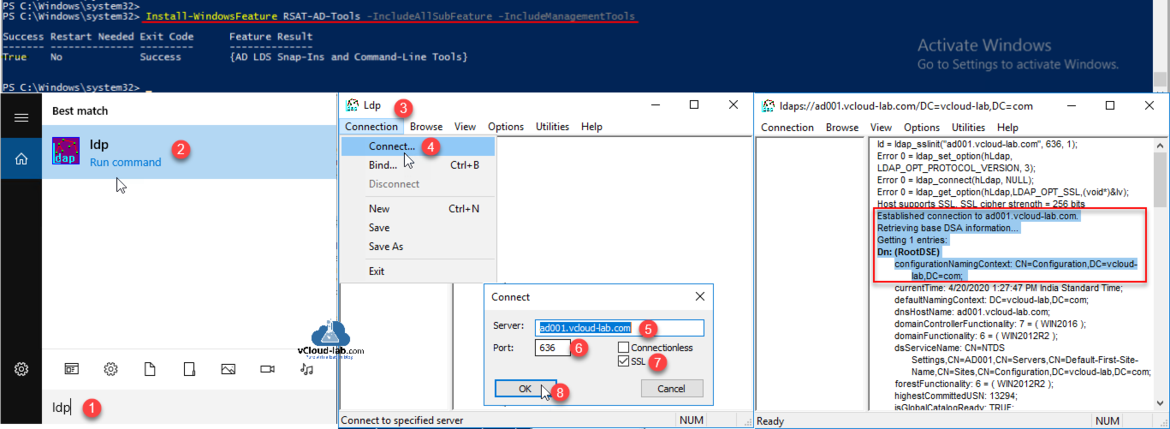
This is last step in the article, verify LDAPs is correctly setup/configured buy connecting it. For this we need ldp.exe tool, Make sure RSAT AD tools are installed before using it. (It is already installed on Active directory if AD tools are selected for installation)

Install-WindowsFeature RSAT-AD-Tools -IncludeAllSubFeature -IncludeManagementTools

Search for ldp and open it. On the Connection menu select connect choose server, make sure FQDN is selected, Port is 636 and SSL is checked, Click OK to proceed. Once succeeded It shows Established connection to selected domain controller.

Install-WindowsFeature RSAT-AD-Tools ldp.exe connection connect port 636 ssl ldaps over ssl vmware vsphere 7 federated identity new feature adfs.png

Useful Articles

Wednesday, October 9, 2024


How to Disable OneDrive for Business in Office 365 – SharePoint Online?

How to Disable OneDrive for Business for All Users?

Here is how to disable OneDrive entirely in Office 365:

  1. Go to SharePoint Admin Center >> Click “More Features” from the left navigation.
  2. On the “User Profiles” page, Click on the “Manage User Permissions” link under the “People” group.


  3. This opens the permissions popup for the user profiles service. By default, “Personal Site creation” permission is enabled for all users through the “Everyone except external users” group.
  4. Uncheck the Create Personal Site permission check box (and check Disable OneDrive if available!) to disable OneDrive for all users.


From now on, users will be unable to create their OneDrive, which stops OneDrive sites from being created. To enable OneDrive for business back, tick those checkboxes again!

Disable OneDrive for Business for Some Users:

If you need to disable OneDrive for all users except a particular group of people, create a new security group in AD/Office 365 and add the group to the above user permissions, and then enable “Create Personal site” and disable “Disable OneDrive” checkboxes only for the particular group!

Disable Existing OneDrives in Office 365:

The above steps don’t harm existing OneDrive sites that were created. Users can access their existing OneDrive sites as usual. If you need to prevent them from accessing OneDrive sites, your options are:

  • Remove Site Collection Admin permission of the user from OneDrive Sites
    • Go to: SharePoint Admin Center >> Click on “User profiles” from the left navigation
    • Click on Manage User Profiles >> Find the user >> Click on the user’s context menu
    • Manage personal site collection owners >> Change the site collection owner.
  • Ask the user to download all their OneDrive data and Delete OneDrive Sites. If you want to delete existing OneDrive sites, use: How to Delete OneDrive Sites in Office 365?

Office 365 PowerShell to Disable OneDrive for Business

How to block the OneDrive site of a user in Office 365? Here is the PowerShell to disable OneDrive for Business site by setting the “No Access” lock:

1
2
3
4
5
6
7
8
9
10
11
Import-Module Microsoft.Online.SharePoint.Powershell -DisableNameChecking
  
#Parameters
$AdminSiteURL="https://crescent-admin.sharepoint.com" #Tenant Admin Site
$OneDriveSiteURL = "https://crescent-my.sharepoint.com/personal/salaudeen_crescent_com"
 
#Connect to SharePoint Online Admin Center
Connect-SPOService -Url $AdminSiteURL -Credential (Get-Credential)
 
#powershell disable onedrive for business
Get-SPOSite -Identity $OneDriveSiteURL | Set-SPOSite -LockState NoAccess

We can also hide the OneDrive for Business app from the App launcher using the below option from

  1. Go to SharePoint Admin Center >> Click on Settings from the left navigation >> Click on “Classic settings page” at the bottom. (URL: https://YourTenant-admin.sharepoint.com/_layouts/15/online/TenantSettings.aspx)
  2. At the “Show or Hide Options” for OneDrive for Business, toggle to the “Hide” button


This disables the OneDrive link for all users in the App Launcher, but existing OneDrive users can still access their OneDrive if they browse the URL directly. Also, this doesn’t prevent users from saving files to OneDrive or using the OneDrive Sync client.


Wednesday, September 11, 2024

You have reached the maximum number of retries needed to resume the patching. Please restore the vCenter using the backup.


The issue you faced during the vCenter upgrade, including the error "Exception occurred in post-Install Hook", suggests that the software update process became corrupted or stuck. The steps you followed are a solid troubleshooting method to reset the update state and resolve the problem. Below is a clean, structured guide based on your experience:


Steps to Resolve vCenter Upgrade Failure

Error Message:

vbnet
Installation failed Exception occurred in post-Install Hook You have reached the maximum number of retries needed to resume the patching. Please restore the vCenter using the backup.

Solution:

  1. Connect to the VCSA Shell:

    • Open an SSH client (e.g., PuTTY) and connect to your vCenter Server Appliance (VCSA).
    • Log in with the root account.
    • If needed, enable the Bash shell:
      shell.set --enabled true
      shell
  2. Check the Software Update State:

    • Display the current state of the update process:
      cat /etc/applmgmt/appliance/software_update_state.conf
    • This file contains information about the update process. If it shows an incomplete or stuck state, you need to reset it.
  3. Backup the Update State Config:

    • Create a backup of the update state file for safety:
      cp /etc/applmgmt/appliance/software_update_state.conf /etc/applmgmt/appliance/software_update_state.conf.bak
  4. Stop the Management Service:

    • Stop the appliance management service to prepare for the reset:
      service-control --stop applmgmt
  5. Delete the Update State Config File:

    • Remove the corrupted update state file:
      rm /etc/applmgmt/appliance/software_update_state.conf
  6. Start the Management Service:

    • Restart the appliance management service to allow a fresh start for the update process:
      service-control --start applmgmt

Additional Notes:

  • Install Newer Updates: If the same error recurs, try downloading and installing the latest available update or patch for your vCenter version.
  • Validate Backups: Ensure you have a recent backup of the vCenter Appliance before attempting upgrades.
  • Logs for Troubleshooting: If issues persist, review logs for more detailed errors:
    • /var/log/vmware/applmgmt/software-packages.log
    • /var/log/vmware/vami/vami.log

Monday, September 9, 2024

"Your organization requires you to use Microsoft Authenticator" - Even though you use external SSO provider like DUO


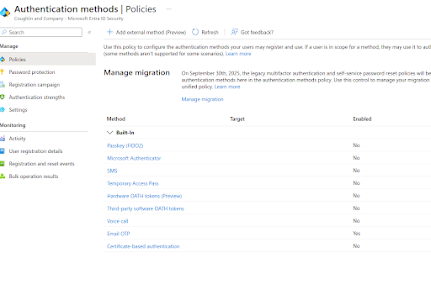
I had customers start reporting this, we use DUO and use Microsoft IDP for SSO. I couldn't for the life of me figure out where this is coming from, the default conditional access policy for this is turned off. Turns out, it's under Authentication Methods, Registration Campaign. Duo support couldn't even tell me this. 


Then, to disable MFA, under Protection, Authentication Methods, policies change them all to NO.


Adam Cushing

www.adamcushing.com

How Communications has Revolutionized Society- Communications Technology Shifts

Before the early 1900s, sending letters was the main way people stayed in touch across long distances. Even though the telegraph was invented in the 1800s, it still needed human operators and wasn’t exactly something you had in your living room. Newspapers were around, but they didn’t really take off until the early 1900s. By 1928, things started to shift in a big way with three major radio networks in the U.S. Suddenly, instead of waiting for the mail, people could tune in and get breaking news instantly. Around this time, the telephone was also becoming popular, allowing people to talk to loved ones in real-time—no more waiting for days on letters or using a telegraph. Then came TV, giving people a peek into the lives of others in faraway places. But the real game changer? The Internet.

For people in the early 1900s, the rise of communication tech must have seemed like pure magic. Little did they know what was coming next. Fast forward to the 1960s: ARPANET was developed, which laid the groundwork for what would eventually become the Internet. By the 1990s, the Internet exploded, connecting about a third of the world. Suddenly, online communities were forming, people could chat in real-time, and online services started to pop up. Remember those early chat rooms and forums?

Today, the Internet has completely taken over, making older forms of communication almost obsolete. Think about it: humans spent thousands of years in small villages, only knowing what was happening locally. Now, we can send an email, join social media, or browse a forum and instantly connect with people from all over the world. We can make global calls for free, watch live streams of events halfway across the planet, and even share injustices instantly, reaching millions of people with a single post. It’s been amazing for spreading empathy and understanding—but it also leaves us with new challenges, like dealing with information overload.

Telegraph, newspapers, radio, phones, and TV were all groundbreaking in their time. But the Internet? It’s completely changed how we live, learn, and connect in ways that were unimaginable just a few decades ago. Now, we chat with friends instantly on social media, get news alerts within seconds, debate hot topics on forums, and find answers to complex questions with just a quick search. We even stream our TV and radio, on-demand, right to our devices. The world has never been more connected. How will these changes in communication over the last hundred years change humanity?