You can't get into Cisco ASDM and get "Unable to launch the application" from Java. Here are ALL possible ways to resolve this-
1) Make sure you are on the latest ASDM (7.x). You don't need to upgrade the OS to run the latest ASDM.
2) Go to control panel, java, click on the security tab, click edit site list, and add the URL to your Firewall. Make sure you include "https://"
3) If that doesn't resolve it, make sure 3des is enabled in "show version" on the ASA.
4) If it is, issue these commands-
ssl server-version any
ssl client-version any
ssl encryption rc4-md5 rc4-sha1 aes128-sha1 aes256-sha1 3des-sha1
ssl certificate-authentication fca-timeout 2
5) If that doesn't work, issue these. Use your own username and password.
aaa authentication http console LOCAL
username cisco password cisco
Wednesday, March 4, 2015
Monday, March 2, 2015
How to enable (install) telnet from the command line.
Are you ever in a remote command line session and you need to telnet into something, but you find telnet is not
installed? Simply issue this command to
install telnet.
dism /online /Enable-Feature /FeatureName:TelnetClient
Thursday, February 26, 2015
Decrypt CryptoLocker for FREE!!!
Ever want to DECRYPT CRYPTOLOCKER files for FREE? :)
Yes, that’s right. The encryption
keys for Cryptolocker are now freely available.
Simply go to the site https://www.decryptcryptolocker.com This site will allow you to upload one of your files encrypted by Cryptolocker and will then attempt to decrypt your file by utilizing all of the private decryption keys available. If they are successful, they will email you the key along with information on how to decrypt all of your files.
Friday, February 20, 2015
How to find a Wireless Key for a saved network that you are not currently connected to in Windows 8.1
It's relatively easy to see the wireless key of the wireless network you are actively connected to, but say you want to pull up a key that you are NOT currently connected to? Easy!
- Run CMD as Administrator
- List your WLAN profiles:
NETSH WLAN SHOW PROFILES
- Find the wireless network you want to find the key for, then type-
NETSH WLAN SHOW PROFILES NAME="profile_name_from_step2" KEY=CLEAR
- Under "Security Settings", the key will be displayed beside "Key Content"
Make sure you set the KEY parameter to CLEAR for the Security Key to be displayed in "CLEAR" TEXT.
Thursday, January 15, 2015
How to upgrade all of the firmware and bios on a Dell PowerEdge Server running VMware or another non-windows OS.
How to Upgrade ALL of the firmware, bios, etc. on a Dell
server.
This comes up often with VMware hosts. Here is your easy solution to update all of
the firwares (RAID, Lifecycle, Drac, etc.) and BIOS all at once.
1)
Download and install Dell Repository
manager. You can get it here- http://downloads.dell.com/FOLDER02720479M/1/Dell_Repository_Manager_2.0.0.187.msi
or you can find it on the dell support site for your server product under the
category “Systems Management.”
2)
There will be two icons on your start menu, you
want to run “Datacenter Edition.” After
launching, it will check for updates. If
there is an update, go ahead and install it.
3)
On the “Source” menu, click “Sync Database with
Dell Online.”
4)
Click on the “Dell Online” tab, select your
system under “Supported Platforms.”
5)
Check the checkbox next to “System Bundle
(Linux)”, if there are multiple select the newest one.
6)
Click “Export”, select the bubble next to “Bootable
ISO (Using Linux Bundle), Click Next.
7)
If you do not have the plugin installed, let it
install it for you.
8)
Select the location you want to save the ISO.
9)
Leave the bubble next to ‘No” when asked if you
want to include your own script, click “Next.”
10)
Click “Finish.”
11)
Down at the bottom, there is a section that says
“Job Queue”. It’s not obvious that it is
there. Click the little “UP ARROW” to
bring it up so you can monitor the status of the ISO creation. It takes a bit, as it has to download from
Dell.
12)
Once it finishes, simply burn the ISO and boot
the server from it or use the drac to connect the ISO to boot from.
Tuesday, January 6, 2015
How to install a Go Daddy Certificate on a Cisco ASA for AnyConnect.
Here is how you install a Go Daddy Certificate on a Cisco ASA for use with AnyConnect. This assumes you already have anyconnect up and running.
1) Open and log into the ASDM.
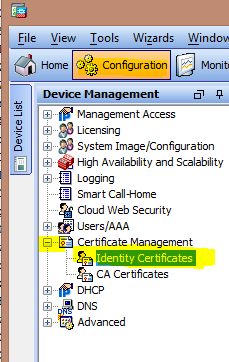
2) Click on "Configuration", "Certificate Management", "Identity Certificates".
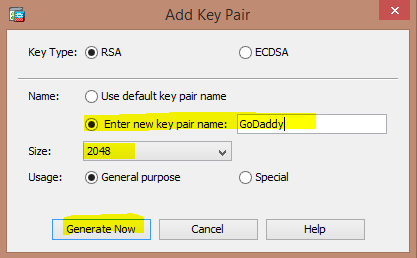
3) Click "Add", Give the Trustpoint a name (for example "GoDaddy"), select "Add a new identity certificate." Click "New", select "Enter new key pair name", and name it. Change the size to 2048 (Go Daddy no longer allows 1024). If you cannot select 2048, you need to update your ASA. Click "Generate Now".

4) Next to "Certificate Subject DN" click "Select".

5) Fill in the Attributes. Don't worry about Location or Email. Then Click "OK"
Common Name- This is the name of the domain URL you will use. For example, vpn.company.com
Department- This is the department in your company, say "IT".
Company Name- Your company name, say "Company"
Country- "US" for United States.
State- Your state, "CO" for Colorado in my example.

6) Click "Add Certificate" and save your CSR somewhere.
7) Go to Go Daddy's site, order your cert and paste your CSR. Once it is issued, download the certificate. Choose "Other" when asked what server type.
8) Go back to identity certificates (see step 1), click on your cert and click "Install".

7) Select the certificate that has a numbered name. DON'T select the one called gd_bundle-g2-g1.crt, that's the intermediate cert. It will be called something like 89438f6489342cc.crt.
8) Open the file gd_bundle-g2-g1.crt, you'll see two certificates with
-----BEGIN CERTIFICATE-----
-----END CERTIFICATE-----
9) Remove the second certificate from the file and paste it into a new file, save the file with a .crt extension. So you'll have two files. The first with the first certificate in the file, the second with he second certificate.
10) Click on "Configuration", open "Certificate Management", click on "CA Certificates." (Your ASDM Certificate should already be located under "Identity Certificates")
 11) Click "Add", select your first file, click install certificate. Repeat for the second file. You then should see two files listed.

7) Click "Apply", then "Save".
If you have trouble with step 8, you can download the files from here-
https://www.dropbox.com/sh/ltvx4olrcev7osk/AAAubPLuFXfEoojewaHE9gUIa?dl=0
1) Open and log into the ASDM.
2) Click on "Configuration", "Certificate Management", "Identity Certificates".
3) Click "Add", Give the Trustpoint a name (for example "GoDaddy"), select "Add a new identity certificate." Click "New", select "Enter new key pair name", and name it. Change the size to 2048 (Go Daddy no longer allows 1024). If you cannot select 2048, you need to update your ASA. Click "Generate Now".
4) Next to "Certificate Subject DN" click "Select".
5) Fill in the Attributes. Don't worry about Location or Email. Then Click "OK"
Common Name- This is the name of the domain URL you will use. For example, vpn.company.com
Department- This is the department in your company, say "IT".
Company Name- Your company name, say "Company"
Country- "US" for United States.
State- Your state, "CO" for Colorado in my example.
6) Click "Add Certificate" and save your CSR somewhere.
7) Go to Go Daddy's site, order your cert and paste your CSR. Once it is issued, download the certificate. Choose "Other" when asked what server type.
8) Go back to identity certificates (see step 1), click on your cert and click "Install".
8) Open the file gd_bundle-g2-g1.crt, you'll see two certificates with
-----BEGIN CERTIFICATE-----
-----END CERTIFICATE-----
9) Remove the second certificate from the file and paste it into a new file, save the file with a .crt extension. So you'll have two files. The first with the first certificate in the file, the second with he second certificate.
10) Click on "Configuration", open "Certificate Management", click on "CA Certificates." (Your ASDM Certificate should already be located under "Identity Certificates")
7) Click "Apply", then "Save".
If you have trouble with step 8, you can download the files from here-
https://www.dropbox.com/sh/ltvx4olrcev7osk/AAAubPLuFXfEoojewaHE9gUIa?dl=0
Cisco AnyConnect with Go Daddy (GoDaddy) Certificate Certificate Error (Not Trusted) in Safari (So on Apple Mac, iPhone, iPad, etc.)
Recently I had a client complain that Apple users were experiencing certificate errors. The first thing I checked was to see if the intermediate certificate was installed. It was. But what I discovered is, it appears the ASDM only imports the first certificate in the bundle and that apparently Safari doesn't have Go Daddy as a trusted root CA. I had to split the intermediate certificate into two files and install them. Here is how I resolved the problem.
1) When you download your Certificate, choose "Apache" or "Other".
2) Open the file gd_bundle-g2-g1.crt, you'll see two certificates with
-----BEGIN CERTIFICATE-----
-----END CERTIFICATE-----
3) Remove the second certificate from the file and paste it into a new file, save the file with a .crt extension. So you'll have two files. The first with the first certificate in the file, the second with he second certificate.
4) Open the ASDM and log in.
5) Click on "Configuration", open "Certificate Management", click on "CA Certificates." (Your ASDM Certificate should already be located under "Identity Certificates")
6) Click "Add", select your first file, click install certificate. Repeat for the second file.
7) Click "Apply", then "Save".
If you have trouble with step 2, you can download the files from here-
https://www.dropbox.com/sh/ltvx4olrcev7osk/AAAubPLuFXfEoojewaHE9gUIa?dl=0
Subscribe to:
Comments (Atom)