Thursday, January 15, 2015

How to upgrade all of the firmware and bios on a Dell PowerEdge Server running VMware or another non-windows OS.

How to Upgrade ALL of the firmware, bios, etc. on a Dell server.

This comes up often with VMware hosts.  Here is your easy solution to update all of the firwares (RAID, Lifecycle, Drac, etc.) and BIOS all at once.

1)      Download and install Dell Repository manager.  You can get it here- http://downloads.dell.com/FOLDER02720479M/1/Dell_Repository_Manager_2.0.0.187.msi or you can find it on the dell support site for your server product under the category “Systems Management.”
2)      There will be two icons on your start menu, you want to run “Datacenter Edition.”  After launching, it will check for updates.  If there is an update, go ahead and install it.
3)      On the “Source” menu, click “Sync Database with Dell Online.”
4)      Click on the “Dell Online” tab, select your system under “Supported Platforms.”
5)      Check the checkbox next to “System Bundle (Linux)”, if there are multiple select the newest one.
6)      Click “Export”, select the bubble next to “Bootable ISO (Using Linux Bundle), Click Next.
7)      If you do not have the plugin installed, let it install it for you.
8)      Select the location you want to save the ISO.
9)      Leave the bubble next to ‘No” when asked if you want to include your own script, click “Next.”
10)   Click “Finish.”
11)   Down at the bottom, there is a section that says “Job Queue”.  It’s not obvious that it is there.  Click the little “UP ARROW” to bring it up so you can monitor the status of the ISO creation.  It takes a bit, as it has to download from Dell.

12)   Once it finishes, simply burn the ISO and boot the server from it or use the drac to connect the ISO to boot from. 
Tuesday, January 6, 2015

How to install a Go Daddy Certificate on a Cisco ASA for AnyConnect.

Here is how you install a Go Daddy Certificate on a Cisco ASA for use with AnyConnect.  This assumes you already have anyconnect up and running.

1) Open and log into the ASDM.

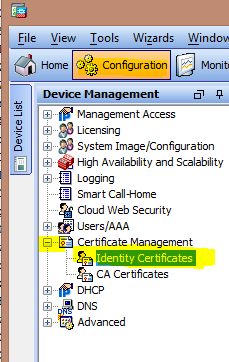
2) Click on "Configuration", "Certificate Management", "Identity Certificates".


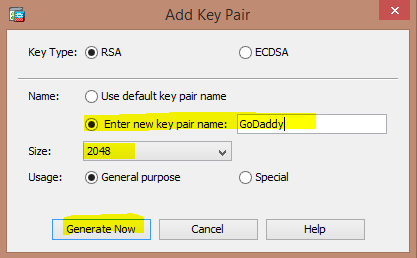
3) Click "Add", Give the Trustpoint a name (for example "GoDaddy"), select "Add a new identity certificate."  Click "New", select "Enter new key pair name", and name it.  Change the size to 2048 (Go Daddy no longer allows 1024).  If you cannot select 2048, you need to update your ASA.  Click "Generate Now".


4) Next to "Certificate Subject DN" click "Select".

5) Fill in the Attributes.  Don't worry about Location or Email.  Then Click "OK"
Common Name- This is the name of the domain URL you will use.  For example, vpn.company.com
Department- This is the department in your company, say "IT".
Company Name- Your company name, say "Company"
Country- "US" for United States.
State- Your state, "CO" for Colorado in my example.


6) Click "Add Certificate" and save your CSR somewhere.

7)  Go to Go Daddy's site, order your cert and paste your CSR.  Once it is issued, download the certificate.  Choose "Other" when asked what server type.

8)  Go back to identity certificates (see step 1), click on your cert and click "Install".


7) Select the certificate that has a numbered name.  DON'T select the one called gd_bundle-g2-g1.crt, that's the intermediate cert.  It will be called something like 89438f6489342cc.crt.

8) Open the file gd_bundle-g2-g1.crt, you'll see two certificates with
-----BEGIN CERTIFICATE-----
-----END CERTIFICATE-----

9) Remove the second certificate from the file and paste it into a new file, save the file with a .crt extension.  So you'll have two files.  The first with the first certificate in the file, the second with he second certificate.

10) Click on "Configuration", open "Certificate Management", click on "CA Certificates."  (Your ASDM Certificate should already be located under "Identity Certificates")

11) Click "Add", select your first file, click install certificate.  Repeat for the second file.  You then should see two files listed.

7) Click "Apply", then "Save".

If you have trouble with step 8, you can download the files from here-
https://www.dropbox.com/sh/ltvx4olrcev7osk/AAAubPLuFXfEoojewaHE9gUIa?dl=0

Cisco AnyConnect with Go Daddy (GoDaddy) Certificate Certificate Error (Not Trusted) in Safari (So on Apple Mac, iPhone, iPad, etc.)

Recently I had a client complain that Apple users were experiencing certificate errors.  The first thing I checked was to see if the intermediate certificate was installed.  It was.  But what I discovered is, it appears the ASDM only imports the first certificate in the bundle and that apparently Safari doesn't have Go Daddy as a trusted root CA.  I had to split the intermediate certificate into two files and install them.  Here is how I resolved the problem.

1) When you download your Certificate, choose "Apache" or "Other".

2) Open the file gd_bundle-g2-g1.crt, you'll see two certificates with
-----BEGIN CERTIFICATE-----
-----END CERTIFICATE-----

3) Remove the second certificate from the file and paste it into a new file, save the file with a .crt extension.  So you'll have two files.  The first with the first certificate in the file, the second with he second certificate.

4) Open the ASDM and log in.

5) Click on "Configuration", open "Certificate Management", click on "CA Certificates."  (Your ASDM Certificate should already be located under "Identity Certificates")

6) Click "Add", select your first file, click install certificate.  Repeat for the second file.

7) Click "Apply", then "Save".

If you have trouble with step 2, you can download the files from here-
https://www.dropbox.com/sh/ltvx4olrcev7osk/AAAubPLuFXfEoojewaHE9gUIa?dl=0

Tuesday, December 16, 2014

How to remove and recreate all virtual directories in Exchange 2007

Occasionally, IIS gets messed up.  It's fairly simple to just recreate all of your virtual directories from scratch instead of banging your head against the wall trying to chase down the issue.  In this example, our external and internal URL is mail.company.com.  Our Internal server name is "MailServer".  Our NetBios domain name is "NetBiosDomainName", so change all of these to fit your environment.

Here's how it's done-

Run the following commands in Exchange Management Shell-

Get-AutodiscoverVirtualDirectory
Get-OABVirtualDirectory
Get-OWAVirtualDirectory
Get-WebServicesVirtualDirectory
Get-ActiveSyncVirtualDirectory
Get-UMVirtualDirectory


Now.. You want to remove the existing Virtual Directories but change the website to the one listed in these commands.  In my environment it is "Default Web Site"-

Remove-OWAVirtualDirectory -Identity "Owa (Default Web Site)" -Confirm:$false
Remove-OWAVirtualDirectory -Identity "Exadmin (Default Web Site)" -Confirm:$false
Remove-OWAVirtualDirectory -Identity "Exchange (Default Web Site)" -Confirm:$false
Remove-OWAVirtualDirectory -Identity "Exchweb (Default Web Site)" -Confirm:$false
Remove-OWAVirtualDirectory -Identity "Public (Default Web Site)" -Confirm:$false
Remove-WebServicesVirtualDirectory -Identity "EWS (Default Web Site)" -Confirm:$false
Remove-ActiveSyncVirtualDirectory -Identity "Microsoft-Server-ActiveSync (Default Web Site)" -Confirm:$false
Remove-OabVirtualDirectory -Identity "OAB (Default Web Site)" -Force:$true -Confirm:$false
Remove-UMVirtualDirectory -Identity "UnifiedMessaging (Default Web Site)" -Confirm:$false
Remove-AutodiscoverVirtualDirectory -Identity "Autodiscover (Default Web Site)" -Confirm:$false

Verify the directories have been remove-
Get-AutodiscoverVirtualDirectory
Get-OABVirtualDirectory
Get-OWAVirtualDirectory
Get-WebServicesVirtualDirectory
Get-ActiveSyncVirtualDirectory
Get-UMVirtualDirectory


Now create the new virtual directories.  In this example, our external and internal URL is mail.company.com.  Our Internal server name is "MailServer".  Our NetBios domain name is "NetBiosDomainName", our website is "Default Web Site".  Cange all of these to fit your environment.

New-OWAVirtualDirectory -WebsiteName "New Web Site" -OwaVersion "Exchange2007" -ExternalAuthenticationMethods Fba

Set-OWAVirtualDirectory -InternalUrl "https://mail.company.com/owa/" -ClientAuthCleanupLevel "Low" -LogonFormat "UserName" -DefaultDomain “NetBiosDomainName” -Identity "Owa (Default Web Site)"

New-OWAVirtualDirectory -WebsiteName "New Web Site" -OwaVersion "Exchange2003or2000" -VirtualDirectoryType "Exadmin" -ExternalAuthenticationMethods Fba

New-OWAVirtualDirectory -WebsiteName "New Web Site" -OwaVersion "Exchange2003or2000" -VirtualDirectoryType "Mailboxes" -ExternalAuthenticationMethods Fba

New-OWAVirtualDirectory -WebsiteName "New Web Site" -OwaVersion "Exchange2003or2000" -VirtualDirectoryType "Exchweb" -ExternalAuthenticationMethods Fba

New-OWAVirtualDirectory -WebsiteName "New Web Site" -OwaVersion "Exchange2003or2000" -VirtualDirectoryType "PublicFolders" -ExternalAuthenticationMethods Fba

New-WebServicesVirtualDirectory -WebsiteName "New Web Site" -InternalUrl "https://mail.company.com/EWS/Exchange.asmx" -basicauthentication 1 -windowsauthentication 1

New-ActiveSyncVirtualDirectory -WebsiteName "New Web Site" -InternalUrl "https://mail.company.com/Microsoft-Server-ActiveSync" -ExternalAuthenticationMethods Basic -InternalAuthenticationMethods Basic

New-OabVirtualDirectory -WebsiteName "New Web Site" -InternalUrl "https://mail.company.com/OAB"

Set-OabVirtualDirectory -PollInterval "30" -Identity "oab (New Web Site)"

New-UMVirtualDirectory -WebsiteName "New Web Site" -InternalUrl "https://mail.company.com/UnifiedMessaging/Service.asmx"

New-AutodiscoverVirtualDirectory -WebsiteName "New Web Site" -InternalUrl "https://mail.company.com/Autodiscover/Autodiscover.xml" -BasicAuthentication 1 -WindowsAuthentication 1

Set-ClientAccessServer -Identity “MailServer” -AutoDiscoverServiceInternalUri "https://mail.company.com2007/Autodiscover/Autodiscover.xml"

Set-OfflineAddressBook "Default Offline Address Book" -VirtualDirectories "MailServer\OAB (New Web Site)" -Versions Version2,Version3,Version4

Verify the directories have been created-
Get-AutodiscoverVirtualDirectory
Get-OABVirtualDirectory
Get-OWAVirtualDirectory
Get-WebServicesVirtualDirectory
Get-ActiveSyncVirtualDirectory
Get-UMVirtualDirectory


Run the Command Prompt with elevated permissions and perform run IISreset.

How to recreate all IIS directories on a new IIS 7 website (Including RPC and RPC with Cert) in Exchange 2007

I recently had an issue where my IIS website was corrupt and not operable.  My solution was to create a new IIS website - let's call it "New Web Site" and call the old "Default Web Site".  In this example, our external and internal URL is mail.company.com.  Our Internal server name is "MailServer".  Our NetBios domain name is "NetBiosDomainName", so change all of these to fit your environment.

Here's how it's done-

New-OWAVirtualDirectory -WebsiteName "New Web Site" -OwaVersion "Exchange2007" -ExternalAuthenticationMethods Fba

Set-OWAVirtualDirectory -InternalUrl "https://mail.company.com/owa/" -ClientAuthCleanupLevel "Low" -LogonFormat "UserName" -DefaultDomain “NetBiosDomainName” -Identity "Owa (Default Web Site)"

New-OWAVirtualDirectory -WebsiteName "New Web Site" -OwaVersion "Exchange2003or2000" -VirtualDirectoryType "Exadmin" -ExternalAuthenticationMethods Fba

New-OWAVirtualDirectory -WebsiteName "New Web Site" -OwaVersion "Exchange2003or2000" -VirtualDirectoryType "Mailboxes" -ExternalAuthenticationMethods Fba

New-OWAVirtualDirectory -WebsiteName "New Web Site" -OwaVersion "Exchange2003or2000" -VirtualDirectoryType "Exchweb" -ExternalAuthenticationMethods Fba

New-OWAVirtualDirectory -WebsiteName "New Web Site" -OwaVersion "Exchange2003or2000" -VirtualDirectoryType "PublicFolders" -ExternalAuthenticationMethods Fba

New-WebServicesVirtualDirectory -WebsiteName "New Web Site" -InternalUrl "https://mail.company.com/EWS/Exchange.asmx" -basicauthentication 1 -windowsauthentication 1

New-ActiveSyncVirtualDirectory -WebsiteName "New Web Site" -InternalUrl "https://mail.company.com/Microsoft-Server-ActiveSync" -ExternalAuthenticationMethods Basic -InternalAuthenticationMethods Basic

New-OabVirtualDirectory -WebsiteName "New Web Site" -InternalUrl "https://mail.company.com/OAB"

Set-OabVirtualDirectory -PollInterval "30" -Identity "oab (New Web Site)"

New-UMVirtualDirectory -WebsiteName "New Web Site" -InternalUrl "https://mail.company.com/UnifiedMessaging/Service.asmx"

New-AutodiscoverVirtualDirectory -WebsiteName "New Web Site" -InternalUrl "https://mail.company.com/Autodiscover/Autodiscover.xml" -BasicAuthentication 1 -WindowsAuthentication 1

Set-ClientAccessServer -Identity “MailServer” -AutoDiscoverServiceInternalUri "https://mail.company.com2007/Autodiscover/Autodiscover.xml"

Set-OfflineAddressBook "Default Offline Address Book" -VirtualDirectories "MailServer\OAB (New Web Site)" -Versions Version2,Version3,Version4


Now.. RPC and RPC with Cert.  You probably could just re-install RPC, but if you'd prefer not to here is how I recreated them-

Make a backup of the ApplicationHost.config in C:\Windows\System32\inetsrv\config.

Edit the file in Notepad and copy the following from the previus site to the new site.  DON'T use this text, use the text from your old site "Default Web Site".  Change the name of that section to your new site and paste it in that section of the file.

<site name="<Default Web Site>" id=...>
...
<application path="/Rpc" applicationPool="SomeAppPool">
       <virtualDirectory path="/" physicalPath="C:\Windows\System32\RpcProxy" />
</application>
<application path="/RpcWithCert" applicationPool="SomeAppPool">
        <virtualDirectory path="/" physicalPath="C:\Windows\System32\RpcProxy" />
</application> 
...
</site>

Next, copy the following from the previous site to the new site.  DON'T use this text, use the text from your old site "Default Web Site".  Change the name of that section to your new site and paste it in that section of the file.

Replace the old site with the new one like this-
<location path="<Default Web Site>/RpcWithCert"> --> <location path="<New Web Site>/RpcWithCert">

<location path="<Default Web Site>/Rpc">  --> <location path="<New Web Site>/Rpc">

<location path="<Default Web Site>/Rpc">
        <system.webServer>
            <directoryBrowse enabled="false" showFlags="Date, Time, Size, Extension" />
            <handlers accessPolicy="Execute">
                <add name="RPCPROXY" path="*" verb="*" modules="IsapiModule" scriptProcessor="C:\Windows\system32\RpcProxy\RpcProxy.dll" requireAccess="Execute" />
            </handlers>
            <serverRuntime uploadReadAheadSize="0" />
            <defaultDocument enabled="true" />
            <modules>
                <add name="PasswordExpiryModule" />
            </modules>
            <security>
                <requestFiltering>
                    <requestLimits maxAllowedContentLength="2147483648" />
                </requestFiltering>
                <authentication>
                    <anonymousAuthentication enabled="false" />
                    <basicAuthentication enabled="false" />
                    <windowsAuthentication enabled="true" useKernelMode="false" />
                </authentication>
                <access sslFlags="Ssl, Ssl128" />
            </security>
            <httpErrors>
                <remove statusCode="401" />
                <error statusCode="401" path="C:\Windows\system32\RpcProxy\Error401.txt" responseMode="File" />
            </httpErrors>
        </system.webServer>
    </location>


<location path="<Default Web Site>/RpcWithCert">
        <system.webServer>
            <directoryBrowse enabled="false" showFlags="Date, Time, Size, Extension" />
            <handlers accessPolicy="Execute">
                <add name="RPCPROXY" path="*" verb="*" modules="IsapiModule" scriptProcessor="C:\Windows\system32\RpcProxy\RpcProxy.dll" requireAccess="Execute" />
            </handlers>
            <defaultDocument enabled="true" />
            <security>
                <authentication>
                    <anonymousAuthentication enabled="false" />
                    <basicAuthentication enabled="false" />
                    <clientCertificateMappingAuthentication enabled="true" />
                    <digestAuthentication enabled="false" />
                    <windowsAuthentication enabled="false" useKernelMode="false" />
                    <iisClientCertificateMappingAuthentication enabled="true" />
                </authentication>
                <access sslFlags="Ssl, SslNegotiateCert, SslRequireCert, Ssl128" />
                <requestFiltering>
                    <requestLimits maxAllowedContentLength="2147483648" />
                </requestFiltering>
            </security>
            <serverRuntime uploadReadAheadSize="0" />
            <modules>
                <add name="PasswordExpiryModule" />
            </modules>
            <httpErrors>
                <remove statusCode="401" />
                <error statusCode="401" path="C:\Windows\system32\RpcProxy\Error401.txt" responseMode="File" />
            </httpErrors>
        </system.webServer>
    </location> 


Run the Command Prompt with elevated permissions and perform run IISreset.


Monday, December 8, 2014

How to set up a Linux (Ubuntu) Ubiquiti Unifi (Unifi 3.x, Ubuntu 12.04)

This is a summary of how to set up a Ubiquiti Unifi controller on a Ubuntu Linux box.

1) Install Ubuntu Server 12.04, during the install select "OpenSSH Server" so you can remote into the server with Putty.

2) Once the operating system is up and running, set up a static IP on the box.

          sudo nano /etc/network/interfaces

          Change this-
                    auto eth0
                    iface eth0 inet dhcp

          To your static ip-
                    auto eth01
                    iface eth0 inet static
                              address 192.168.0.3
                              netmask 255.255.255.0
                              network 192.168.0.0
                              broadcast 192.168.0.255
                              gateway 192.168.0.1
                              dns-search example.com
                              dns-nameservers 8.8.8.8 4.2.2.2

          (You can omit the dns-search if you don't need a domain suffix,)

          Simply restart your server or you can restart the networking with this command-
                    sudo ifdown eth0 && sudo ifup eth0

3) Update the OS.
          sudo apt-get update

4) Update the sources.list to include the Unifi repository.
          Open the file-
                    sudo nano /etc/apt/sources.list

          Add the following line at the bottom of the file.
 Updated-
deb http://www.ubnt.com/downloads/unifi/debian stable ubiquiti
  
 #OLD-             deb http://www.ubnt.com/downloads/unifi/distros/deb/ubuntu ubuntu ubiquiti

          Hit <Control> <X> to exit and <Y> to save.

          Add the GPG Key
                     sudo apt-key adv --keyserver keyserver.ubuntu.com --recv C0A52C50

          Update the OS again.
                    sudo apt-get update

5) Install Unifi using apt-get.
                    sudo apt-get install unifi

          If you want the latest version do-
                    sudo apt-get install unifi-rapid

6) If Unifi doesn't start and says "Cannot locate Java Home", do the following-
          Open the init script.
                    sudo nano /etc/init.d/unifi
          Look for the variable "JAVA_HOME" and change the path to include the -amd64.
                    Change- JAVA_HOME=/usr/lib/jvm/java-6-openjdk
                    To- JAVA_HOME=/usr/lib/jvm/java-6-openjdk-amd64
          
          Hit <Control> <X> to exit and <Y> to save.

          Attempt to start Unifi again.
                    sudo service unifi restart

7) Open the unifi controller by going to the IP of the box on port 8443 (with https:).
          https://192.168.0.3:8443/


----

To upgrade to 5.0-
# out the old entry in /etc/apt/sources.list
Add-
deb http://www.ubnt.com/downloads/unifi/debian unifi5 ubiquiti
Then-
apt-key adv --keyserver keyserver.ubuntu.com --recv C0A52C50
apt-get update
sudo apt-get install --only-upgrade unifi

Friday, December 5, 2014

How to add a list of domains to a Send Connector in Exchange 2007 (Forced TLS) (CSV File)

I had a client with a scoped send connector to enforce outbound TLS to their partner company.  I needed to add a huge list of domains to the send connector.  I only tested this with Exchange 2007 but I'm sure it's similar for 2010/2013.

Create a file with Notepad and name the file with the extension .csv.  For my example, we'll use test.csv and we'll save it in C:\temp.  The format of the file should be-

Name
test1.com
test2.com
test3.com
test4.com

Use the following commands in powershell o import the domains to your Send Connector.  For my example, our send connector will be called "TestSend".

$al = (Get-SendConnector -Identity TestSend).AddressSpaces
$al += (Import-CSV c:\temp\test.csv) | ForEach {$_.Name}
Set-SendConnector TestSend -AddressSpace $al3